3 Tips for Collecting Samples with Tape Stripping

Tape Stripping is a non-invasive option for the study of biomarkers in dermatology studies. Innovaderm is sharing its 3 best tips when performing tape strip collections.
Let’s cover our bases, what is tape stripping?
Tape stripping is used in dermatology studies to sample skin surface material by collecting a thin layer of cells from the epidermis. This process begins with an adhesive disc that is applied directly to the skin’s surface. Please keep in mind throughout this article that such processes are dependent upon study specific instructions.
Material collected with tape strips may be used for many types of analyses, including gene expression, protein, microbiome, and lipid analyses.
Pre-procedure tips:
-
- Always wear gloves when manipulating samples
- Forceps may be used to help disc manipulation
- There is a white tongue on the edge of the discs, this part is to be used for handling
Pressure instruments may be used in tape stripping studies. These tools are to ensure even and consistent adhesion of each tape strip to the skin. Pressure instruments may have the shape of a piston with a rubber end that is applied against the disc on the skin in a spring action. Its use is dependent on the type of sample being collected with the tape strips. Once again, before considering using any such tools, the study specific instructions should be consulted especially as to its requirement and how long the pressure instrument should be applied.
1. Keep an ideal spacing between lesional and non-lesional samples
Lesional samples are collected directly from the targeted lesion while the non-lesional samples are collected on healthy skin usually adjacent to the targeted skin area. The objective when performing non-lesional sampling is to have a comparable skin sample to the skin from the target lesion. Innovaderm recommends keeping a spacing of 2.5 to 5 cm between the peripheral edges of the two adjacent sample areas.
2. Use marks to ensure consistent alignment during the sample collection
The following elements are to be closely considered when collecting tape strip samples (here again based on study specific instructions):
-
- Target lesion criteria
- Specification on area(s) of sample collection
- The number of tapes to be collected per area(s)
- Time points at which the samples are to be collected
Depending on the study design, sequential tape strips collection might be the necessary technique to use. This process implies to sequentially add and remove multiple discs to the same collection area which allows a deeper sampling into the epidermis while ensuring sample integrity by reducing background noise that may be observed at the analysis step. protecting the integrity of the skin.
If a study design includes a sequential tape strip collection, it is important to begin by placing small markings around the first tape strip to ensure the next sequential discs are applied in perfect alignment. These markings can be done using a black permanent marker around the targeted area. For example, on average, twenty tape strips are sequentially collected per area of interest for gene expression purposes (once again, always refer to study-specific instructions). A significant step in this process is to document the location of sample area collection which is crucial when tape stripping is performed on multiple visits to evaluate change through time.
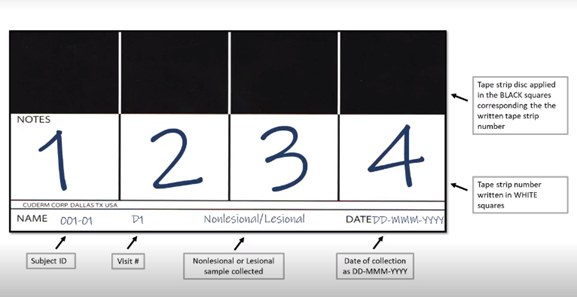
3. Filling out storage cards
Tape strips may be collected and applied on a storage card. Card numbering and labeling will require specific instructions due to the multiple types of analyses to be performed based on specific study design.
The storage card process begins by applying the discs containing the skin sample onto the black squares- one disc per black square. The corresponding disc number is to be written on the white squares. Additional information may be written on the bottom of the card in the index section, or depending on study specifics and workflows, a label may be applied. It is recommended to fill out the storage card before the visit to avoid errors and reduce subject burden by eliminating unnecessary waiting time.
Tape stripping is an accessible and efficient method to collect samples in dermatology trials. As it has been mentioned thoroughly through this article, the general instructions given do not apply to every study trial. One should always refer to study specific instructions when utilizing tape stripping in a given trial.
About the Author
Ana Palijan, PhD, is an expert on assessing operational feasibility and implementing corrective measures proactively. She currently heads the early phase department where she collaborates with sponsors to ensure quality study conduct and data while maintaining subject and site experience at the forefront. Ana is a scientist at heart who applies rigorous scientific approach and streamlined processes for early phase and proof-of-concept studies. Inspired by innovation in research, she is to be lauded for her extraordinary work ethic, dedication and creativity.
Click here to receive Innovaderm’s guidance on your next clinical trial involving tape stripping.
Want to ensure your study is a great success? Contact us today to partner with our expert team of clinical trial professionals.
Newsletter
Newsletter subscription resources

